자바스크립트로 크롬 시계 앱 만들기 [3]

1. 배경화면 다운로드
Beautiful Free Images & Pictures | Unsplash
Beautiful, free images and photos that you can download and use for any project. Better than any royalty free or stock photos.
unsplash.com
무료 이미지 다운로드 하는 사이트. 한 3개 정도 다운받아보자.
프로젝트 폴더 내에 images 폴더를 만들어서 안에다가 3개의 이미지 파일을 넣어보자
1.jpg, 2.jpg, 3.jpg 로 이름도 바꿔놓고
2. 랜덤 함수
Math.random() * 5 <-- 를 하면 5 미만. 즉 0.0.. ~부터 4.99... 사이의 랜덤 숫자를 가져오게 되는데 소숫점이 껴있다.
소수점을 빼버리면 0, 1, 2, 3, 4 를 가져오게 되는거지.

Math.floor() 를 통해 소숫점 내림을 하자. 반대로 올려버리는거는 ceil()

즉 Math.floor(Math.random() * 3) 을 하게되면 이미지 3개가 있으니까 랜덤으로 숫자 뽑아오겠지
3. 이미지 body 에 표시하기
html 에<script src="bg.js"></script> 를 추가하고 bg.js 를 작성한다.
const body = document.querySelector("body"); // body

const IMG_NUMBER = 3;

function paintImage(imgNumber){
    const image = new Image();  // image 생성
    image.src = `images/${imgNumber + 1}.jpg`; // 경로 지정해주고
    body.prepend(image); // body 에 child 로 image 를 붙여주자
}

function genRandom(){
    const number = Math.floor(Math.random() * IMG_NUMBER);
    return number;
}

function init(){
    const randomNumber = genRandom(); // 랜덤 숫자 생성해서
    paintImage(randomNumber); // 숫자.jpg 를 표시하러
}

init();

그럼 css 를 통해 그림을 좀 수정해보자
function paintImage(imgNumber){
    const image = new Image();
    image.src = `images/${imgNumber + 1}.jpg`;
    image.classList.add("bgImage"); // ★ bgimage class 추가
    body.prepend(image);
}
@keyframes fadeIn{
from {
opacity: 0;
}
to {
opacity: 1;
}
}
.bgImage {
position: absolute;
top: 0;
left: 0;
width: 100%;
height: 100%;
z-index: -1;
animation: fadeIn 0.5s linear;
}

4. 위치정보 가져오기
weather.js 를 만들고 html에 추가하자.
const COORDS = "coords";

function handleGeoSuccess(position) {
    console.log(position);
}

function handleGeoError(err) {
    console.log(err);
}

function askForCoords() {
    navigator.geolocation.getCurrentPosition(handleGeoSuccess, handleGeoError);
}

function loadCoords(){
    const loadedCoords = localStorage.getItem(COORDS);
    if(loadedCoords === null){
        askForCoords();
    } else {
        // getWeather
    }
}

function init(){
    loadCoords();
}

init();
현재 위치 정보를 가져오는 askForCoords() 를 보자.
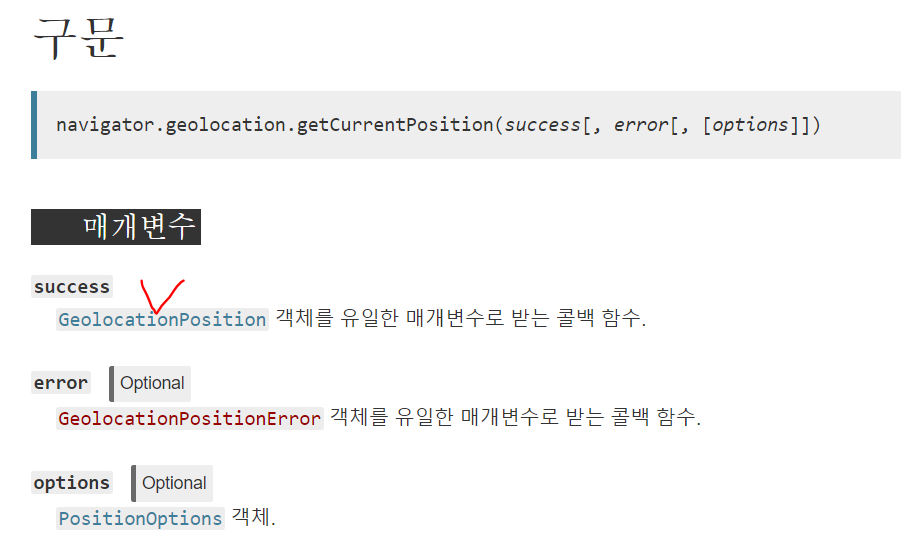
navigator.geolocation.getCurrentPosition(success[, error[, [options]])
success, error 콜백 함수와 option 을 가지고 있다


수락하게 되면 내 현재 위치가 찍힌다.

근데 콜백함수 인자같은건 어떻게알아? 저게 들어가는지 어떻게알았어?

developer.mozilla.org/ko/docs/Web/API/Geolocation/getCurrentPosition
Geolocation.getCurrentPosition()
Geolocation.getCurrentPosition() 메서드는 장치의 현재 위치를 가져옵니다.
developer.mozilla.org
이제 우리의 위도 경도를 가져올 수 있으니까 localstorage 에 저장해보자
function saveCoords(coordsObj) {
localStorage.setItem(COORDS, JSON.stringify(coordsObj));
}
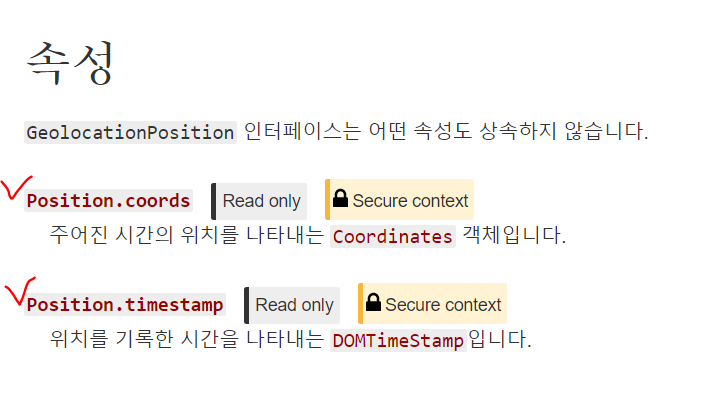
function handleGeoSuccess(position) {
const latitude = position.coords.latitude;
const longitude = position.coords.longitude;
const coordsObj = {
latitude : latitude,
longitude : longitude
};
// 위의 내용이랑 같은 뜻. 표기를 아래와 같이 해도 됨.
//const coordsObj = {
// latitude,
// longitude
//};
saveCoords(coordsObj);
}
5. 날씨 API 사용하기
Сurrent weather and forecast - OpenWeatherMap
2 Billion Forecasts Per Day 2,500 new subscribers a day 2,600,000 customers 20+ weather APIs 2 Billion Forecasts Per Day 2,500 new subscribers a day 2,600,000 customers 20+ weather APIs
openweathermap.org
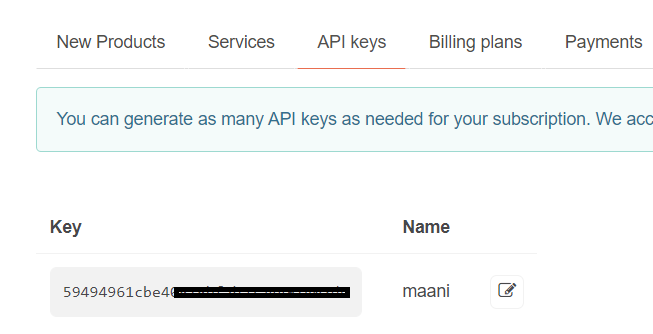
회원가입 하고 나의 api key를 발급 받는다. 복사해놓자
openweathermap.org 서버로 내 위도와 경도를 보내서 위치를 가져오기 위해
저... api 사용하기로 발급받은 maani 입니다!! 라고 하는 key 도 있어야 한다
그럼 어떻게 사용하냐
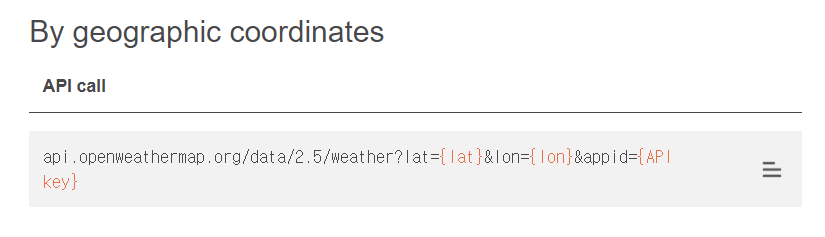
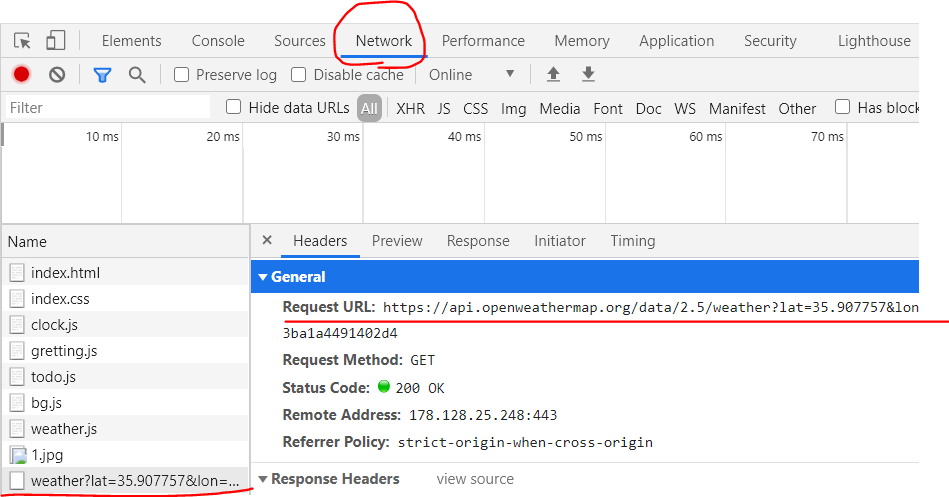
function getWeather(lat, lon) {
    fetch(`https://api.openweathermap.org/data/2.5/weather?lat=${lat}&lon=${lon}&appid=${API_KEY}`);
}
fetch 함수를 사용해서 요청을 해보자. 당연히 저 인자 lat, lon 에는 알맞은 값 넣고 API_KEY 에는 내 key

이렇게 응답이 왔긴 한데. temp 가 온도 겠지? 근데 화씨로 되있다. 이걸 섭씨로 바꿔주자

function getWeather(lat, lon) {
    fetch(`https://api.openweathermap.org/data/2.5/weather?lat=${lat}&lon=${lon}&appid=${API_KEY}&units=metric`);
}

이걸 fetch 로 보냈던걸 가져와서 활용해보자
function getWeather(lat, lon) {
    fetch(
        `https://api.openweathermap.org/data/2.5/weather?lat=${lat}&lon=${lon}&appid=${API_KEY}&units=metric`
    )
    .then(function(response) {
        return response.json();
    })
    .then(function(json){
        const temperature = json.main.temp;
        const place = json.name;
        weather.innerText = `${temperature} @ ${place}`;
    });
}
fetch 뒤에 .then 보면 2개가 있다. 첫번째 .then 은 그냥 약속 이다. 저렇게 쓰고
두 번째 .then 에서 function(json) 에서 json 가지고 꺼내다 쓰면 된다
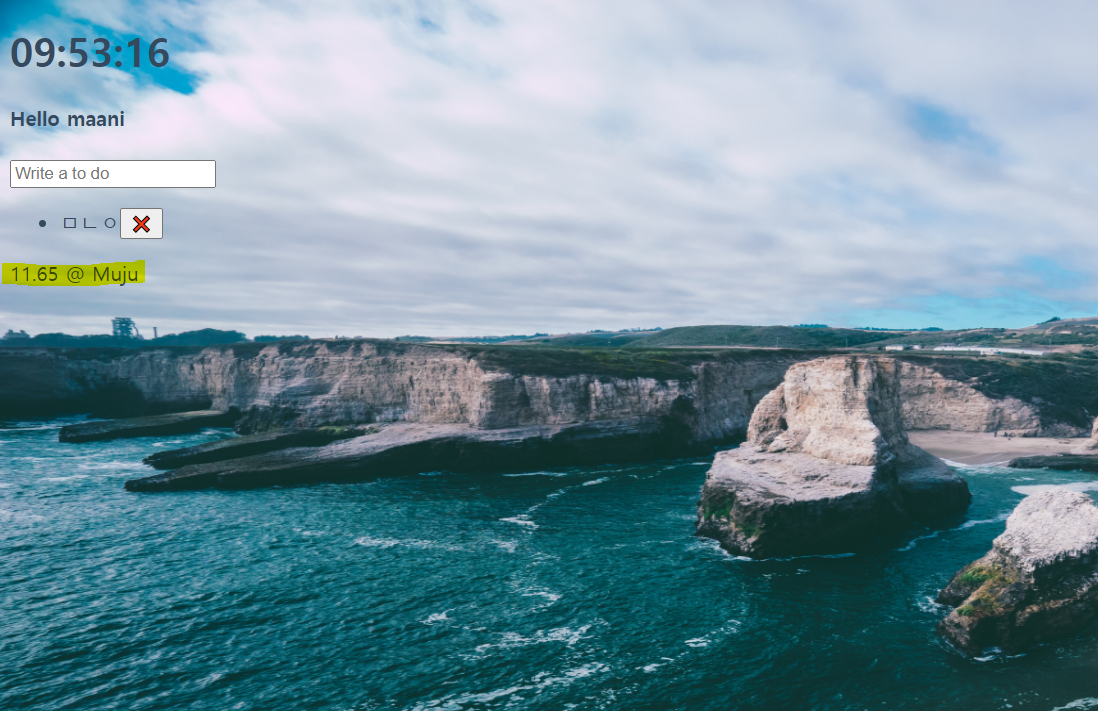
weather 은 html 에서 <ul> 아래에 <span> 하나 넣어줬고 (<span class="js-weather"></span>)
weather.js 에서 document.querySelector(".js-weather"); 로 const weather 에 담아서
weather.innerText 에 저렇게 온도 @ 지역 을 표시했다
css ... 몰라서 이쁘게는 못꾸미겠다... ㅠㅠ
소스코드는 아래에
leekangman/clock
js clock. Contribute to leekangman/clock development by creating an account on GitHub.
github.com